Minio is a cost-effective object storage, fully compatible with Amazon S3 (Simple Storage Service). This solution is best suited for storing unstructured data, such as photos, videos, log files, etc. It can be used to support a wide range of use cases, including data archiving, big data analytics, backup and disaster recovery.
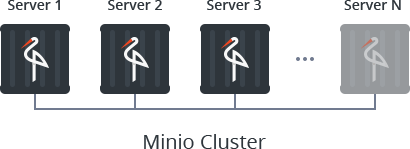
Minio implements a microstorage architecture to create a cluster (by provisioning a large number of small interconnected storage instances) and ensure its scalability and high availability. Alongside with this, integration of the commonly used within mass storage systems Reed-Solomon error correction coding mechanism allows to maintain cluster operability and ensures full data restoration even in a case the half of available Minio instances fail.
Below, we provide a step-by-step guide on how such clustered storage solution can be installed within Jelastic PaaS in just a few clicks due to the embedded possibility of the advanced processes automation. Also, we’ll show how to manage Minio via both user-friendly web interface and through the dedicated console application, ending up with a brief exploration of the presented solution cost-efficiency.
Minio Cloud Storage Cluster Installation
With the help of specially developed Jelastic one-click installation Minio Cluster package, you are able to create the required number of Minio docker containers all at once, with them being automatically interconnected into a reliable S3-compatible storage. This way, all you need to do in order to get your own object storage cluster up and running inside the cloud, is to execute a few simple steps, described below.
1. So, enter your Jelastic dashboard at the chosen platform and click Marketplace at the top tools pane to find the Minio Cluster solution.
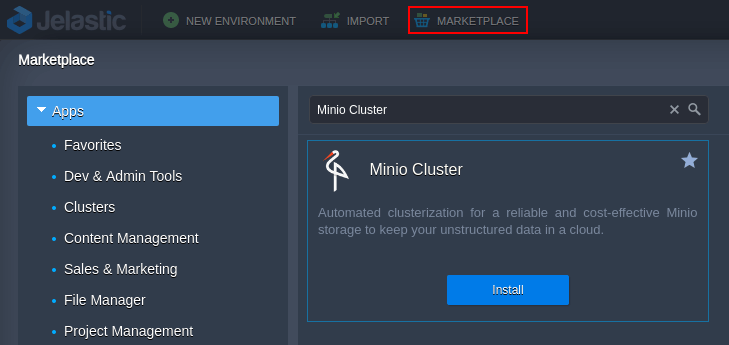
Tip: In case the Minio Cluster package is not available within your Marketplace, you can simply import the link to the manifest.jps file from the appropriate repository.
https://github.com/jelastic-jps/minio/blob/master/manifest.jps

Click on the Install button to proceed.
2. In a few seconds, you’ll be shown the corresponding installation form.
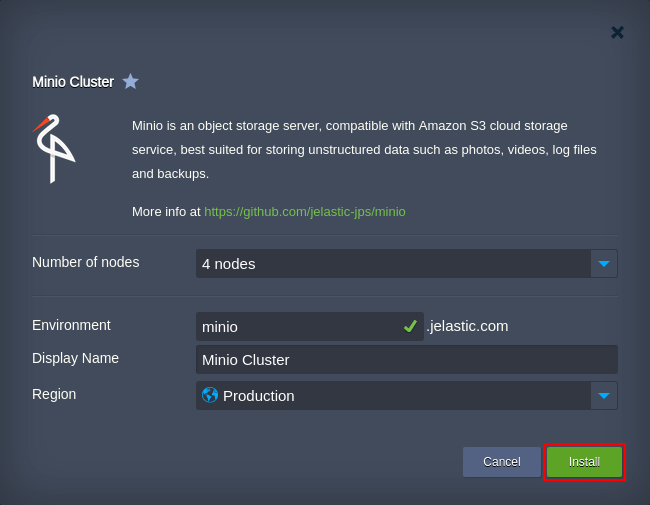
Here you need to specify the required parameters for your clustered data storage through filling in the following fields:
- Number of nodes – specify the required cluster size by choosing among the predefined options to create 1 (for development), 4, 8 or 16 Minio nodes – each of them will be handled in a separate container, which are distributed across available hardware servers to gain high availability;
- Environment – type in the preferred name for your Minio storage cluster (which, together with your platform domain, will constitute an internal environment name);
- Display Name – optionally, add an alias name to be displayed for the environment in the dashboard;
- Region – select a hardware set for your environment to be hosted (this option is active only if several regions are available).
When ready, Install the package by clicking on the same-named button at the bottom-right corner.
3. Wait a few minutes for Jelastic to automatically create and set up your cluster. Once this operation is completed, the system will inform you about the successful installation by displaying the corresponding pop-up frame.
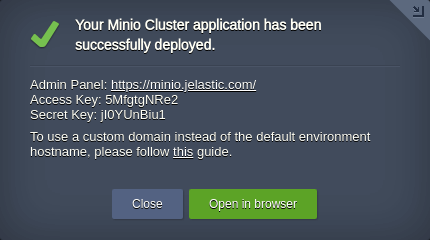
Here, you’ll see the Admin Panel access URL (click Open in browser for a quick redirect) and automatically generated credentials (Access Key and Secret Key), which will be needed for further authentication.
4. Upon referring to the environment start page, a new tab will be opened, where you need to specify your Access and Secret keys for entrance.
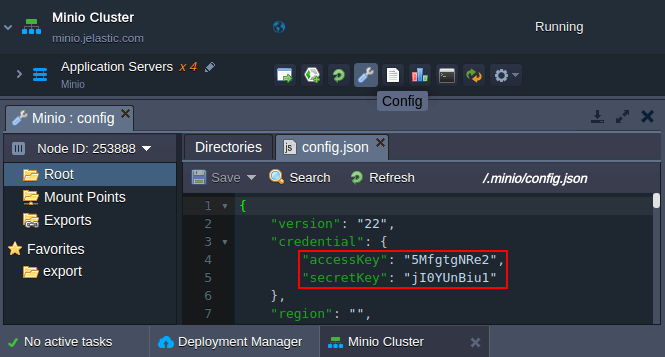
Note: In case you’ve occasionally closed the success pop-up without copying the keys, both of them can be found in the .minio > config.json file or within the appropriate email notification, received after the package deployment.
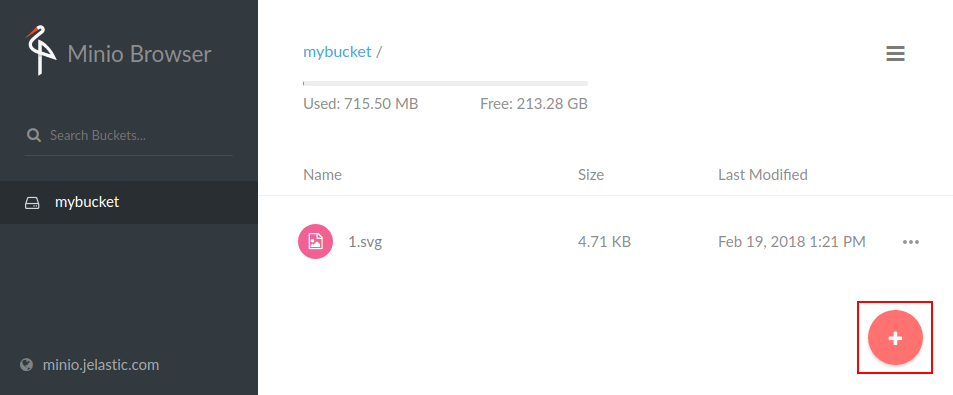
5. Now, you can manage your files with the help of a user-friendly web interface. For example, use the + button at the bottom-right corner to create a new bucket and upload the needed files to the storage.
Note: The default cluster settings assume that connection to your Minio cluster is established via Jelastic Shared Load Balancer. Within the majority of the Jelastic platforms, this infrastructure element has a restriction on the uploaded file size – up to 512 MB. So, in order to operate with larger files, you’ll need to attach a Public IP address to at least one of your cluster nodes:
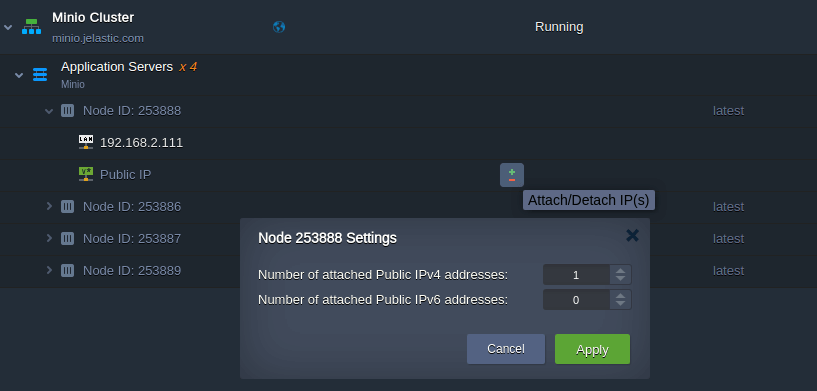
Herewith, adding Public IP provides some extra possibilities – for example, you can bound a custom domain name to the received address and secure connection to your cluster by generating and attaching the appropriate domain-associated custom SSL certificate.
That’s it! Now your reliable storage cluster is up and ready-to-work.
Minio Client to Access Object Storage Cluster
Apart from the web admin panel, you can access your Minio storage cluster through a dedicated console client to perform your data management via terminal. For that, download Minio client from the official web site, install it, and follow the simple steps below:
1. Create local alias for your Minio storage with the following command:
./mc config host add {storage} {cluster_domain} {access_key} {secret_key}

where:
- {storage} – a local alias for your Minio cluster (e.g., minio-storage);
- {cluster_domain} – domain name of your Minio storage cluster (https://minio.jelastic.com in our case) or its Public IP (in the following format: http://192.168.1.1);
- {accessKey} and {secretKey} – the corresponding credentials for your cluster access (we’ve already considered where to find them in the previous article section).
2. Next, you need to create a new bucket, where your data will be stored:
./mc mb {storage}/{bucket}

Substitute the {bucket} placeholder with the preferable name (e.g., my-bucket).
3. Now, you can upload any file or folder (just add the appropriate -r flag) to your storage server, using the following command:
./mc cp {upload} {storage}/{bucket}

Here, the {upload} placeholder is a path to a folder (file), which should be uploaded. For example, we’ve uploaded all files with the .svg extension from the Download folder on a local machine to storage.
Tip:
- Find out the detailed guide on the Minio client in the official documentation;
- Minio is compatible with AWS CLI to work with S3 cloud storage services and supports a set of Java API libraries for implementing some complex data workflows.
Minio Object Storage Resource Consumption
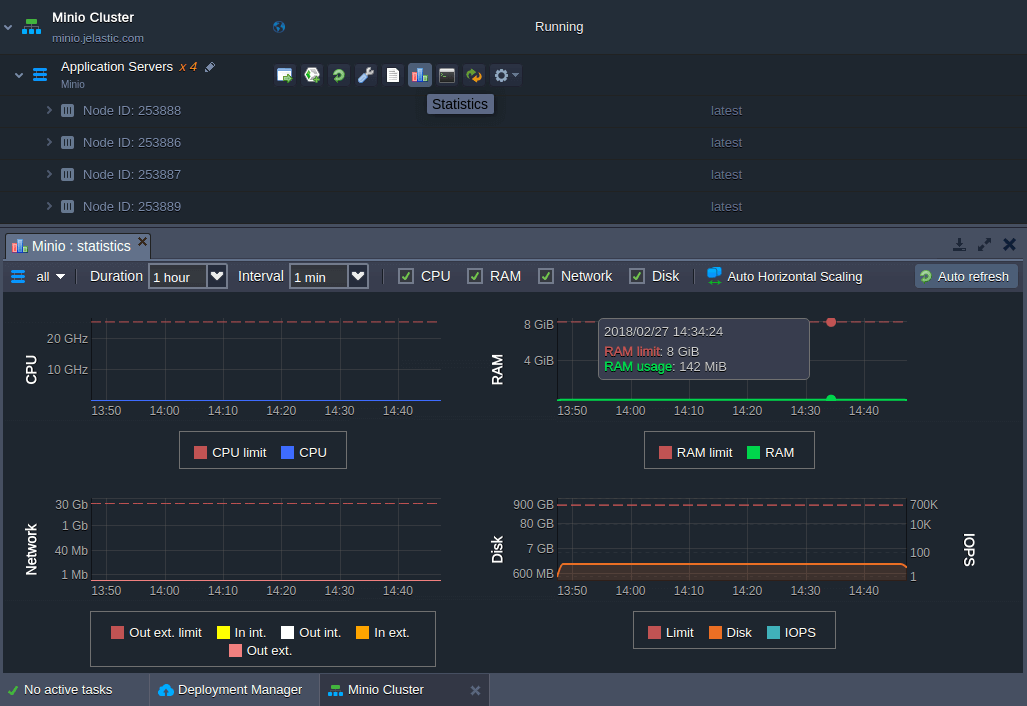
Minio cluster consumes less than 1 cloudlet (equals to 128 MB of RAM and 400 MHz of CPU) per node in the idle mode. Herewith, the default package settings assume that each Minio instance can be vertically scaled up to 16 cloudlets (i.e., 2 GB of RAM and 6.4 GHz of CPU).
For example, as it is shown in the image below, for a clustered storage with 4 Minio nodes, the total RAM usage will be just 142 MB. This way, due to the Jelastic fair “pay as you use” pricing approach, you’ll be charged just for a single cloudlet per node but not for the whole scaling limit of 16 cloudlets!
Being such a cost-effective solution, Minio cluster by Jelastic also provides an advanced data protection against the hardware failures and silent data corruption by means of erasure code and checksums. This allows to withstand the failure of up to half of cluster instances and still be able to recover the data.
To ensure such reliability, only 50% of the total cluster disk space is available for usage. For example, if you host 4 Minio nodes with 100 GB limit per container (the required amount also can be adjusted via topology wizard), your S3 storage cluster will be able to retain 50% * 4 * 100 GB, which equals 200 GB of data.
That’s it! Now you know how to easily deal with an own cost-effective Minio storage cluster setup within Jelastic PaaS and its further management. Give it a try to instantly get a solution, which can tolerate a failure of a half of its instances without any data loss.
