Given the fact that Java hosting occupies one of the leading positions in creating web applications, it is understandable the widespread popularity of Apache Tomcat among developers. Due to recently gathered statistics, 28.9% of Jelastic PaaS users also prefer Tomcat server for deploying their projects.
Considering the demand, we decided to get into more details on how to install Tomcat latest version, configure this Java web server and its load balancing, deploy the application and improve Tomcat security on Jelastic PaaS.
Create Tomcat Server
Jelastic Platform as a Service provides easy steps for Tomcat installation.
1. Register and log into the dashboard at our Jelastic PaaS platform.
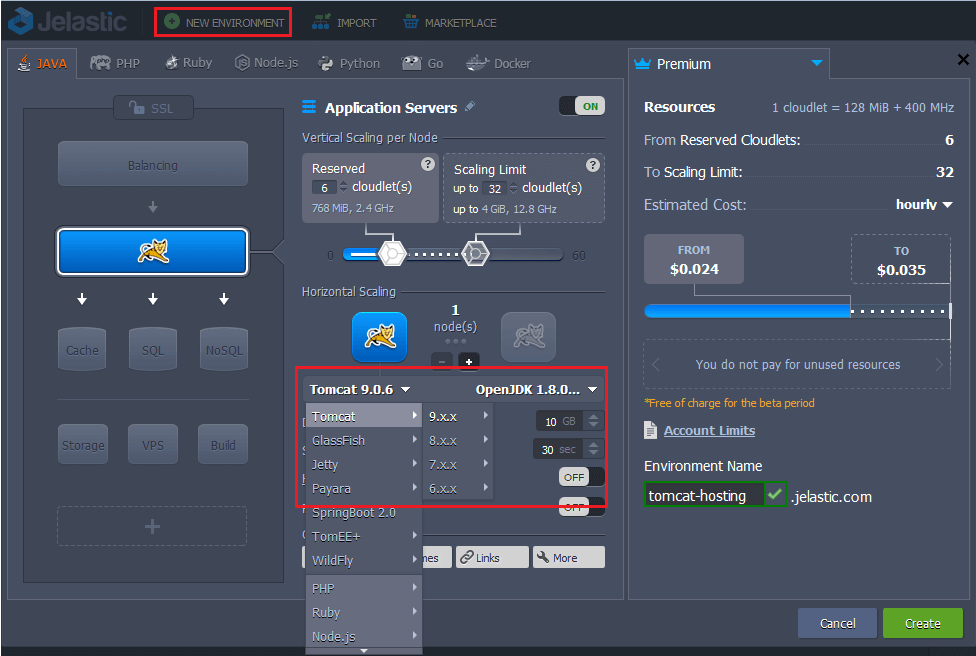
2. Click New Environment button.
3. Pick desirable Tomcat version for your application server as shown in the picture below. The cloud platform allows you to use Apache Tomcat versions starting from 6 up to the latest Tomcat 9 depending on your application requirements. All you need is to choose from the versions available in the drop-down list.
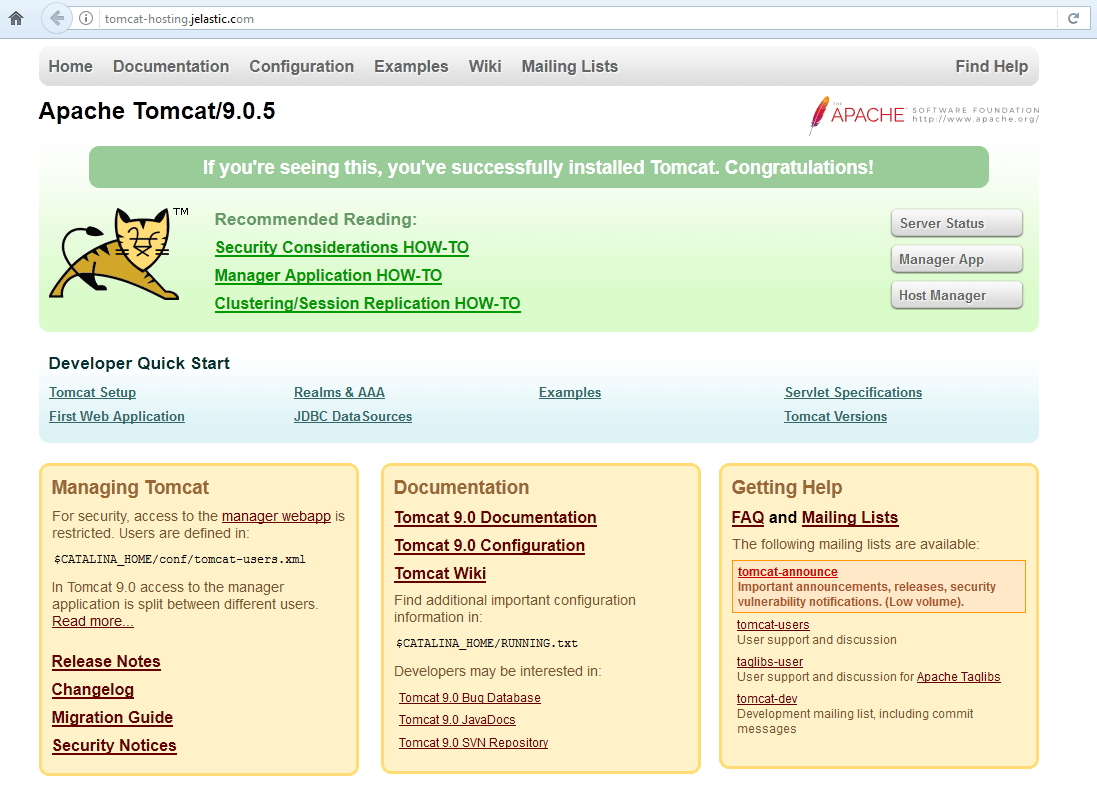
Once the environment is created, you have ready to use Tomcat application server installed there. To check if Tomcat is running, click Open in browser button next to the web server in the environment.

The server is properly installed, so the welcome Tomcat web server page is displayed in your browser.
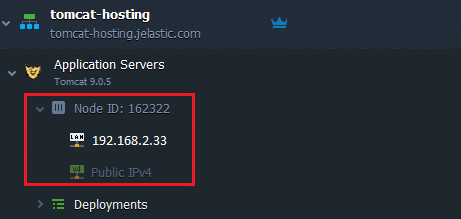
The application server is operating in a separate container (node) which is an isolated virtualized instance, provisioned for a software stack. The container has its own private IP and unique DNS record.
Change Tomcat Version
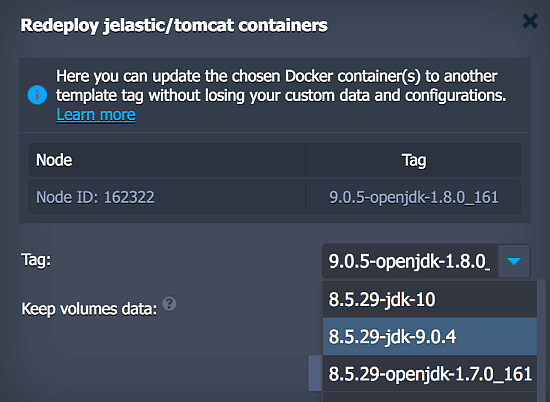
If you need to change the version of your installed server, you can do this any time without losing data or configurations.
Just click the Redeploy containers button next to the Apache Tomcat server node.
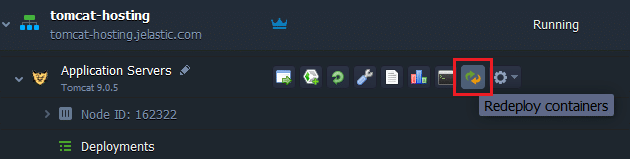
Select a new Tomcat version (e.g., Tomcat 8) in the appeared dialog and confirm the change.
Tomcat Clustering and Scaling
Jelastic PaaS can automatically scale applications, both vertically and horizontally, as well as set up a Tomcat cluster making hosting truly flexible.
Automatic Vertical Scaling
Automatic vertical scaling is made possible by Jelastic ability to dynamically change the amount of allocated resources (RAM and CPU) for a server according to its current demands, with no manual intervention required. This feature guarantees you never overpay for unused resources and saves your time due to eliminating the necessity of handling the load-related adjustments or architectural changes.
In order to set up automatic resource consumption by your Tomcat server, open the environment topology wizard and specify the upper scaling limit of cloudlets (each equals to 128 MB and 400 MHz) with the slider located at the top.
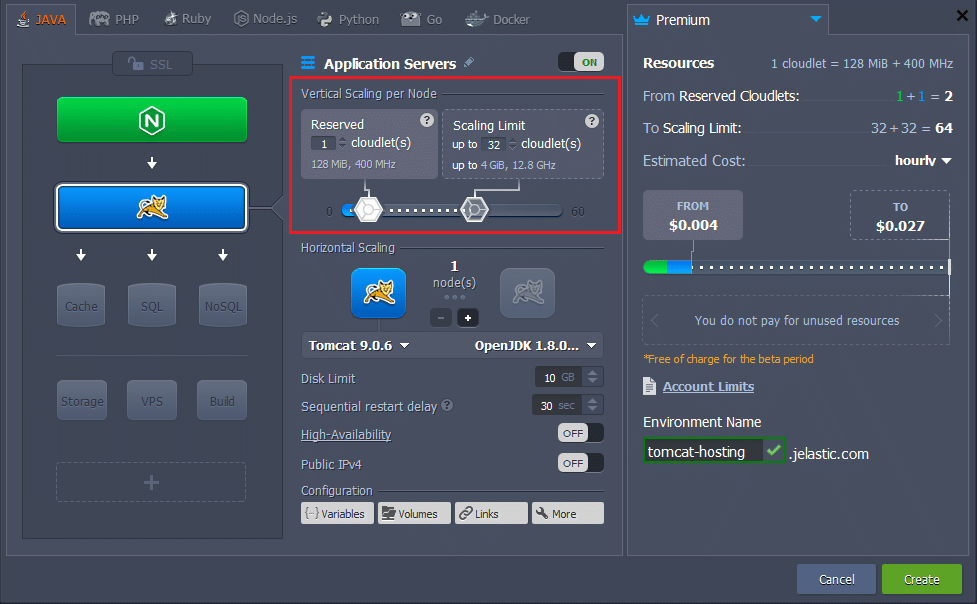
Your application will work within these limits reducing resource consumption when the load is down or increasing them when the load is up. Thus, you only pay for the resources that are actually consumed. For more information, please refer to the documentation about automatic vertical scaling.
Manual Horizontal Scaling
For adding extra Tomcat servers manually, just click the Change environment topology button.

Then press “+” button in the wizard and add the required number of instances.
The maximum number of the same-type servers within a single environment layer depends on default platform settings (usually this limit stands for 16 nodes and can be adjusted by sending a request to support). You can check the exact value within the Quotas & Pricing > Account Limits information frame.
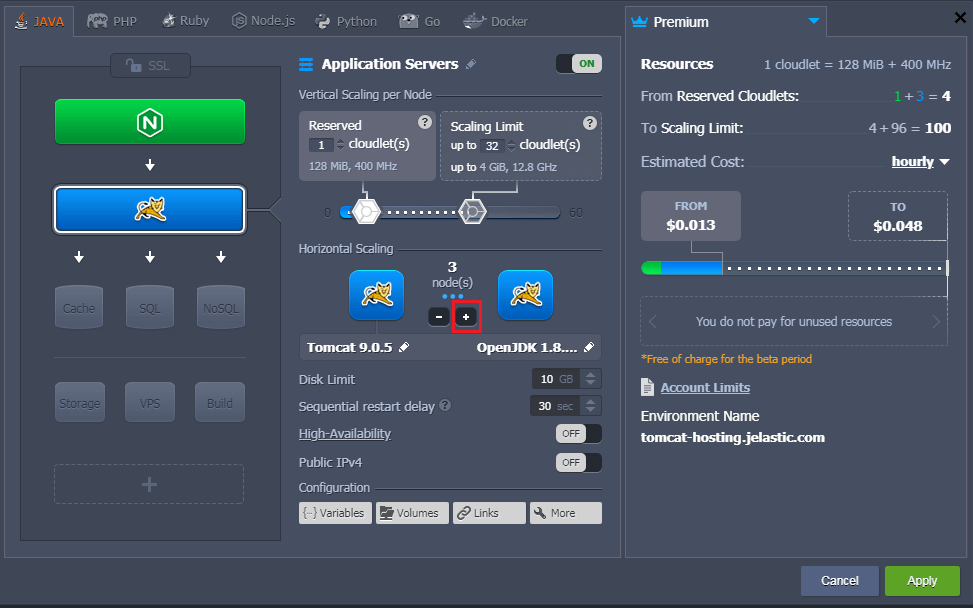
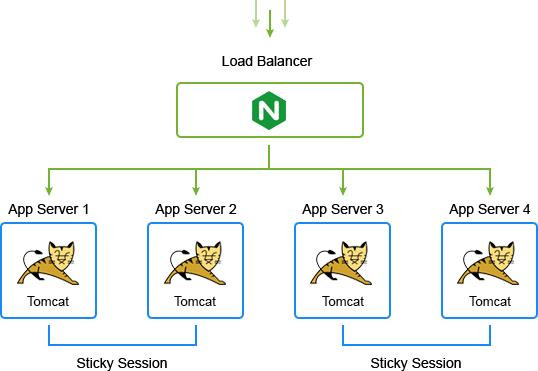
As you can see, when you add extra servers, Apache Tomcat load balancing is enabled automatically. This Load Balancer represents the front-end which receives all the incoming requests and evenly distributes them between back-ends – application servers.
Please, find more details about manual horizontal scaling in the documentation.
Automatic Horizontal Scaling
Automatic horizontal scaling can be implemented by means of tunable triggers, which monitor the changes in application’s load and increase or decrease the number of nodes due to them.
To configure a trigger for automatic horizontal scaling, use the Settings button for the desired environment.

Navigate to the Monitoring > Auto Horizontal Scaling section.
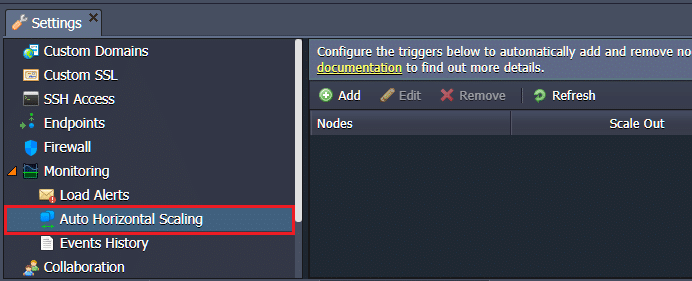
By pressing the Add button you can configure the triggers for specific stacks and resources (CPU, RAM, Network and Disk) within your environment separately. Just specify the conditions of scaling and apply changes.
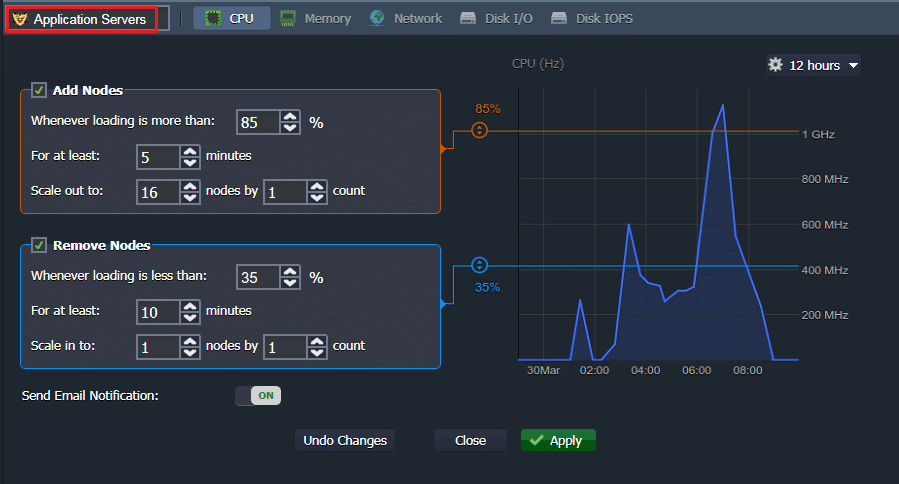
Please, find more details about automatic horizontal scaling in the documentation.
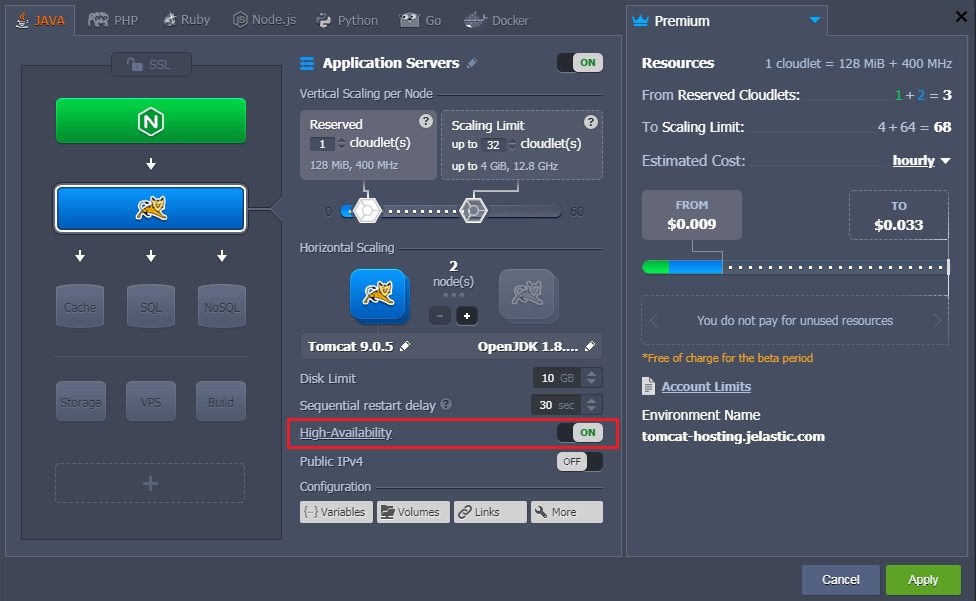
Automatic Tomcat Clustering
The embedded application server clustering feature provides replication of sessions between pairs of nodes and eliminates the necessity of additional software or Memcached usage for increasing application availability.
You can get multicast replication between pairs of Tomcat servers without any manual configurations. If one of the instances fails, the users who were on that instance are automatically moved to the other instance in the cluster.
To activate Tomcat clustering, you just need to turn on High-Availability button within environment wizard as shown in the picture below.
Deploy Application to Tomcat Environment
There are several options on how to deploy Java applications to a Tomcat environment but the most common way is by means of the Deployment Manager.
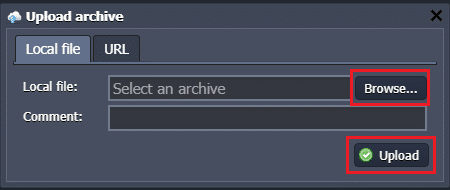
1. Open Deployment Manager from the taskbar of the Jelastic dashboard and click Upload button.
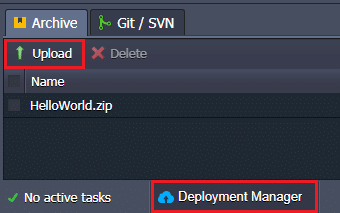
2. Browse to your local file (or use URL to your project) and upload it. The Deployment Manager supports .WAR, .ZIP or .EAR formats.
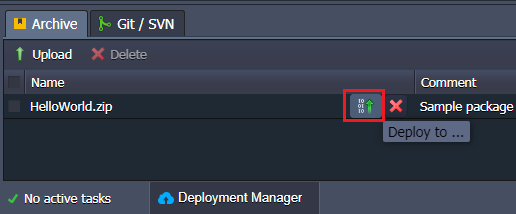
3. Select your package in the list and click Deploy to button.
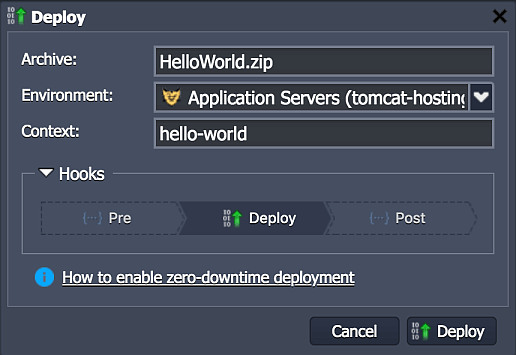
4. Choose the appropriate environment, specify context (or leave default ROOT value) and start deploying the application.
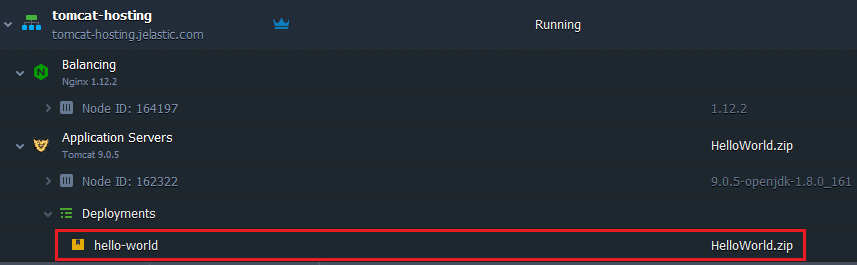
5. When the process is completed, you can see your project within deployments of the environment.
There are more options for deploying your application to Tomcat, for example, via Git/SVN using Maven build node. For more information refer to the Deployment Guide.
Tomcat Configurations
In this part we will cover some settings and features that help to optimize your work with Tomcat web server.
Environment Variables
In order to make your application more portable and flexible, you can use environment variables instead of specifying the required values in the application code each time. Jelastic PaaS provides you with a number of Tomcat default environment variables for the commonly used directories. You can find them in the table below.
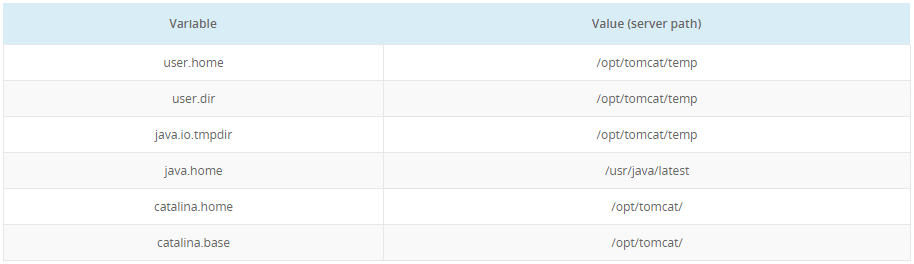
Along with default ones, you can add custom Tomcat environment variables which are stored in /opt/tomcat/conf/variables.conf file.
Configuration Files
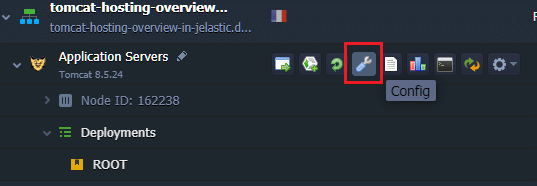
The Tomcat configuration files are available for editing right from the dashboard. In order to access them, press the Config button next to the Tomcat server.
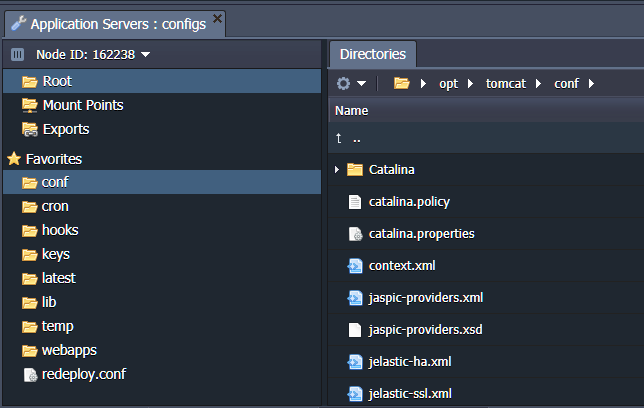
Then use the available file manager for browsing.
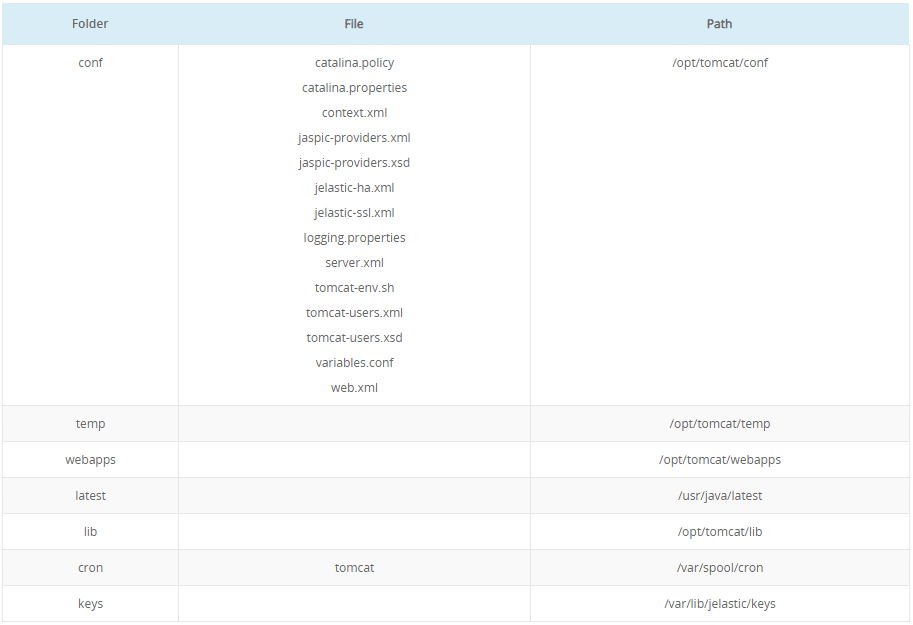
In the table below you can find the names and paths to the core Apache Tomcat configuration files.
Please, find more details about Tomcat server configurations in the documentation.
Tomcat Security Settings
In order to restrict access to your project deployed to Tomcat server, we recommend two possible solutions: set up user authentication and deny access to your web application for the certain client IP addresses. The detailed instruction is described in the article on how to Secure Tomcat Hosting.
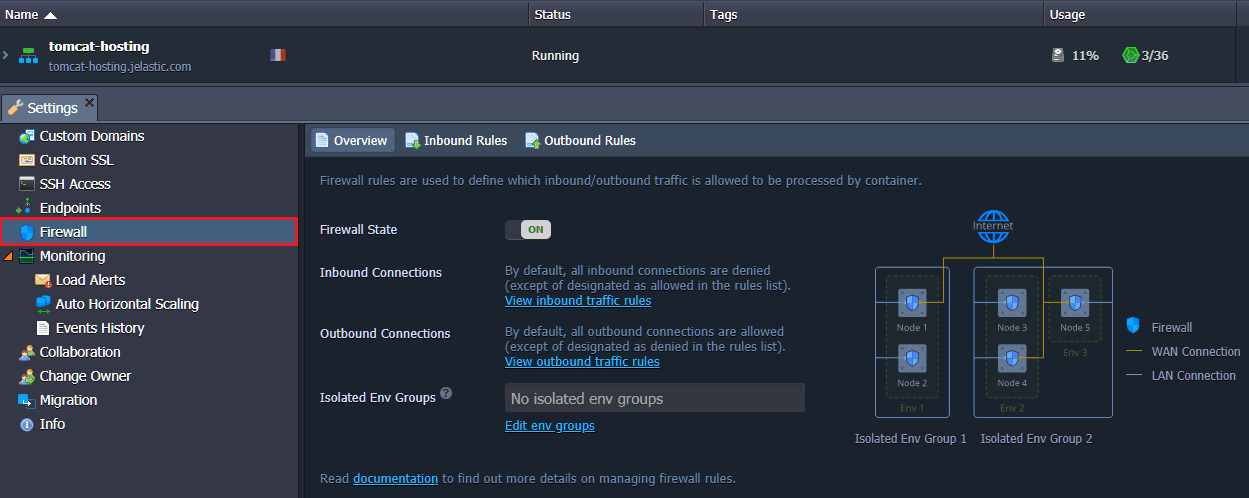
One more way to ensure the security of your applications is using Container Firewall feature. It lets control your nodes availability both from inside and outside of the platform. Configure Tomcat container firewall using the information from the Container Firewall Management documentation.
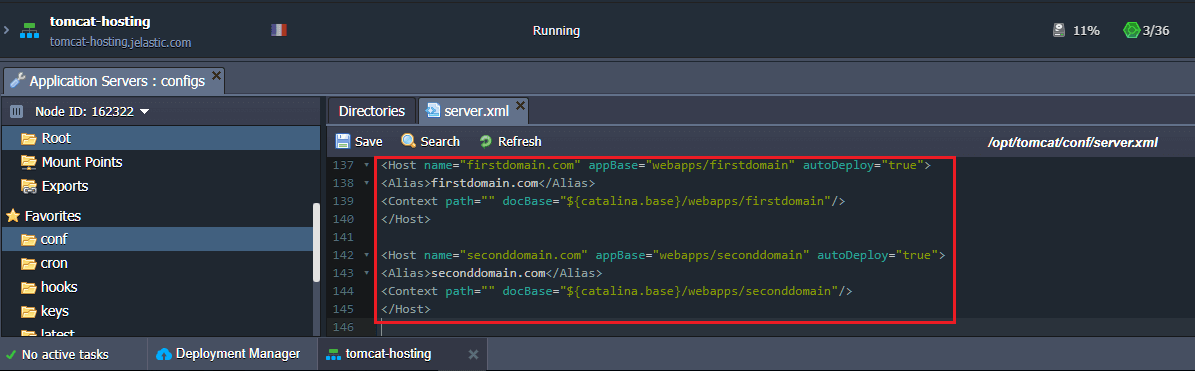
Multiple Domains on Single Tomcat Server
You can set up multiple domain names on the Tomcat server in order to increase the usability, efficiency and scalability of your application, as well as save your costs without having to configure separate instances. For this, make some minor adjustments within Tomcat configuration files as described in the documentation about multiple domains.
As you can see, Jelastic PaaS makes Tomcat hosting easy and flexible. The cloud platform provides a wide range of already predefined settings for you not to bother about routine tasks, and at the same time leaves the server fully customizable for specific complex configurations. Get started with effortless Tomcat cloud hosting from our Jelastic PaaS platform and enjoy the benefits in a turnkey package.