 Nowadays, a lot of developers around the world are tend to use Docker containers as a unified application packaging and deployment solution. Such applications can be developed locally and built as containers for being delivered to the cloud infrastructure.
Thus, today we are going to highlight the key points of the native Docker support integration within Jelastic PaaS – in particular, we’ll pay attention to the dedicated Jelastic-adapted Docker Engine solution. It allows to set up a new Docker instance in just several clicks, running it as either a separate standalone node or a part of an already existing Swarm cluster. So, let’s glimpse the key specifics of the automated Docker Engine deployment and the options it could be run with.
Specifics of Docker CE Installation
Upon installing the package, the platform creates an isolated worker node with the Docker Community Edition (CE) engine being run inside, which is someway similar to launching it within a separate virtual machine (VM). Herewith, the Platform additionally provides automatic vertical scaling for all such worker nodes, allowing to escape worrying about right-sized resource limits whilst anyway paying only for the actually used capacities.
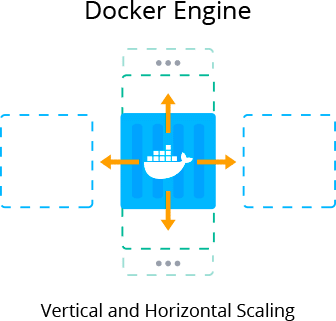
In addition, if expecting that your application would experience heavy steady load or occasional load spikes, you could scale the created node horizontally via topology wizard in advance, or configure a set of auto-scaling triggers to automatically increase/decrease the number of workers.
Herewith, the comprehensive Docker technology support within Jelastic PaaS makes it possible to work with all the integral components of this containerization technology, namely:
- Docker Registry – allows to store and access numerous public and/or private images, intended for deployment within Docker-running containers;
- Docker Engine – processes Docker files (i.e., manifests with prescribed Docker image parameters) to implement containers on their base;
- Docker Compose – helps to assemble applications, which consist of multiple components (where all the required configurations are declared within a single compose file);
- Docker Machine – lets establishing connection to remote Docker nodes and their management with docker-machine commands;
- Docker Swarm – represents a number of independent Docker nodes, interconnected into a cluster.
At the same time, due to the smooth integration of Docker application containers and Virtuozzo system containers, developers are able to operate with dockerized applications inside the cloud similar to the natively assumed workflows, whilst still benefiting on such inherent Platform features as a convenient graphic user interface, auto-scaling and pay as you use pricing, joint collaboration on a project and multi-cloud infrastructure with its location and infrastructure versatility.
Before installing the Docker Engine package, please consider the following points:
- The chosen Platform should run Jelastic version 5.2 or later and contain environment region(s) with the native Docker support enabled;
- In order to be able to manage Docker nodes via docker-machine, the package requires a public SSH key being added to your Jelastic account, whilst the corresponding private key should be handled at your local machine.
Next, let’s consider the modes that your Docker Engine server could be run with depending on your goals and reveal specific deployment options for each of them.
Docker Engine Automatic Installation
Finally, we’ve got to the point of our review – actual installation of the Jelastic-managed Docker Engine solution.
Due to being delivered through Jelastic Marketplace, its deployment represents an extremely simple process, which, we believe, is already familiar for the majority of our readers. Nevertheless, let’s consider the implied steps in short just for the case, examining the appropriate deployment options at once.
1. Log into the dashboard and click the Marketplace button at the top panel.

Within the opened frame, search for the Docker Engine package, hover over it and click Install to continue.
2. A confirmation dialog will appear in a moment.
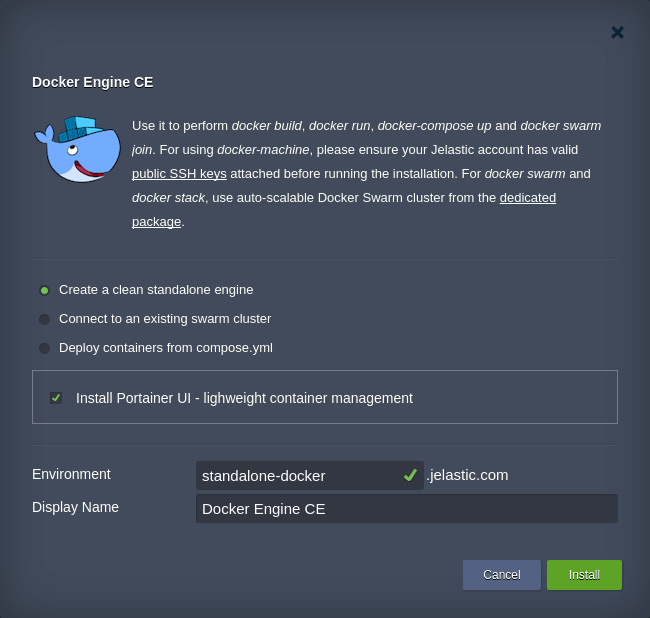
Here, you need to provide some details on the desired Docker Engine environment parameters using the following options:
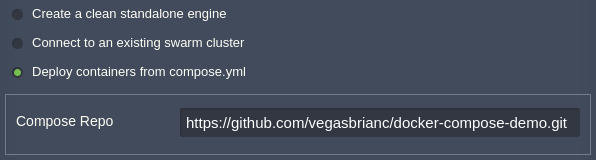
- Choose the preferred deployment mode;
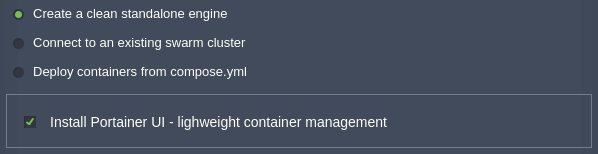
- Create a clean standalone engine – to set up a bare node with just a Docker daemon run inside; optionally, you could tick the Install Portainer UI option to integrate the same-named web-based Engine management tool;
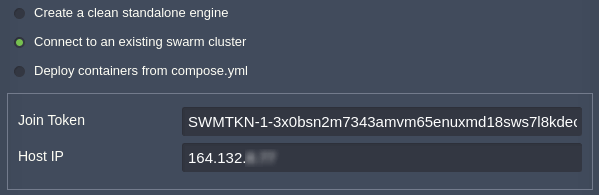
- Connect to an existing swarm cluster – to automatically include the newly created Docker Engine container into the existing Docker Swarm cluster (with either Manager or Worker role) through providing the appropriate cluster Join Token and Host IP;
- Deploy containers from compose.yml – to automatically deploy an application from the specified custom repository;
- Create a clean standalone engine – to set up a bare node with just a Docker daemon run inside; optionally, you could tick the Install Portainer UI option to integrate the same-named web-based Engine management tool;
- Environment – type a name for your environment;
- Display Name (optional) – specify an environment alias for its better differentiation within the Jelastic dashboard and SSH Gate.
Click Install and wait a few minutes for Jelastic to automatically perform all the required actions, i.e., to set up a new environment with a container, built upon the appropriate specifically adjusted Jelastic-managed stack template, install the Docker Engine itself and, depending on the option chosen, deploy the provided image.
Once all these tasks are completed, your dockerized instance is already running and ready to work with, whilst you’ll be shown the appropriate dashboard notification with administrator credentials for its management (also duplicated to your account email).
At this point, we believe, you’d like to “play” with your Docker Engine server in the cloud and test how all the inherent Jelastic features are applied here, thus we’ll give you some time to try it out. And the next time we are going to consider the ways you could connect to this instance and dive into some specifics of the provisioned deployment modes. Thus, keep following our blog and come back in a few days to find out more interesting details on Docker Engine hosting within Jelastic PaaS!