One of the key issues we should deal with hosting production applications is to ensure its security. The very basic and commonly used approach for secure data exchange is encrypting the application traffic with HTTPS protocol using SSL certificates.
Besides that, starting from January 1st, 2017 one of the most popular browsers – Google Chrome – have started marking all web-pages, that request specifying password or credit card details and aren’t secured with SSL, as non-secure. Such novelty makes the encryption integration even more essential.
However, issuing and configuring custom SSL certificate for a project can be a rather complicated and time-consuming task. Let’s Encrypt (LE) is a free and open certificate authority, that allows to greatly simplify and automate the process of the trusted SSL certificates integration.
A general trend of moving Web to HTTPS implies the complete automation of custom SSL certificates issuing and appliance. Thus, Jelastic developers have made a great job on packaging Let’s Encrypt service with Cloud Scripting, to implement a solution that allows getting rid of carrying out regular certificates renewal.
The key advantage of this solution is a unique out-of-box integration with the most popular load balancer and application server stacks. In such a way, it gives a possibility to freely secure the majority of existing applications that run in Jelastic PaaS.
Being provisioned as an add-on, this solution can be easily installed on top of any container with the Custom SSL support enabled, namely the following servers (the list is constantly extended):
- Load Balancers – NGINX, Apache LB, HAProxy, Varnish;
- Java application servers – Tomcat, TomEE, GlassFish, Payara, Jetty;
- PHP application servers – Apache PHP, NGINX PHP;
- Ruby application servers – Apache Ruby, NGINX Ruby.
If you require Let’s Encrypt SSL for any other stack, just add a load balancer in front of your application servers and install the add-on. SSL termination at load balancing level is used by default in clustered topologies.
How It Works
During the installation, the add-on downloads and configures Let’s Encrypt client (so-called certificate management agent (CMA)), requests certificates from Let’s Encrypt Certificate Authority (CA), applies issued certificates to running software stack according to its SSL integration specifics and adds a special cron job to initiate certificates update when the expiration date is close.
Domain Control Validation
Upon the certificates issuing request, Let’s Encrypt CA checks the entry point of the environment at the 443 port in order to prove that the given web-server controls the specified domains. Herewith, during the domain validation process, all incoming HTTPS traffic will be internally routed to the custom 9999 port where the corresponding CMA runs. Thus, a brief 2 seconds drop can occur in HTTPS traffic processing for the time of this verification procedure. At the same time, all the HTTP traffic, received at the 80 port by default, continue being processed without any interruption.
In case a layer contains several same-type nodes, during the update period all incoming HTTPS traffic will be additionally routed to the master node where the CMA runs. This is achieved by setting special temporary DNAT routing rules so the domain validation request can be handled by the CMA.
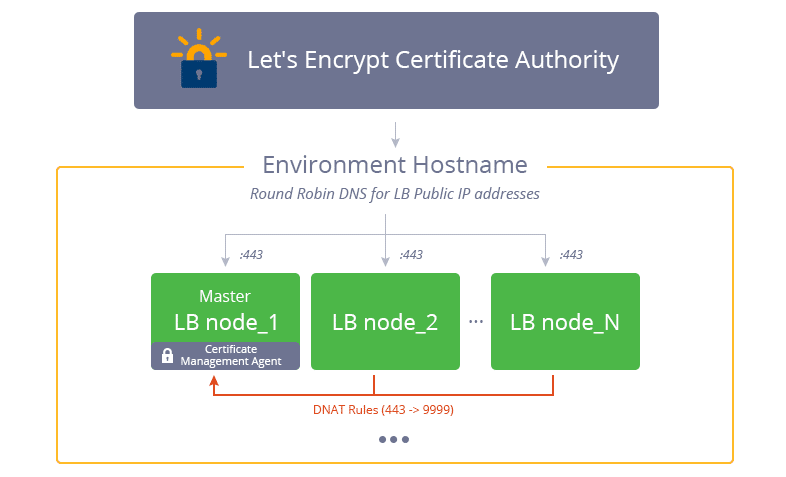
Since such redirection is required only during domain validation, these special DNAT settings will be removed just after the hostname correspondence is confirmed.
After successful domain validation, CMA gets the ability to request, renew and revoke SSL certificates for specified domains, so it will automatically generate the appropriate SSL key pair. As a result, the issued certificates will be propagated to all nodes within the entry point layer via Jelastic API so the application will be properly configured for the further work via HTTPS.
Despite the long description, all of these operations are handled just in a matter of minutes. Now, let’s find out how to actually initiate the Let’s Encrypt add-on installation.
Let’s Encrypt SSL Add-On Installation
To get a SSL certificate for the environment hostname, perform the following:
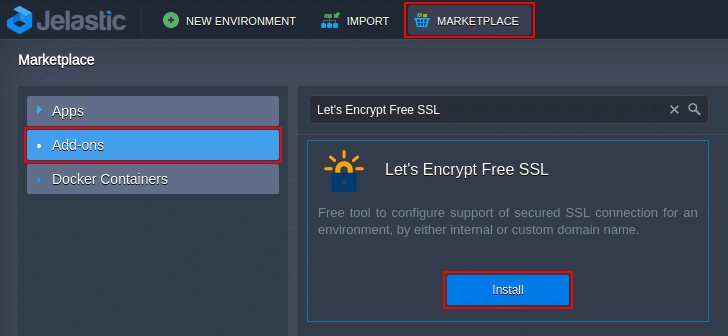
1. Log into Jelastic dashboard and click Marketplace at the top of a page. Within the opened frame switch to the Add-ons tab and find the Let’s Encrypt Free SSL package.
Importing add-on via JPS tab allows providing customization on a fly.
Click Install to proceed.
2. After the required data is fetched, you’ll see the Let’s Encrypt SSL add-on installation window.
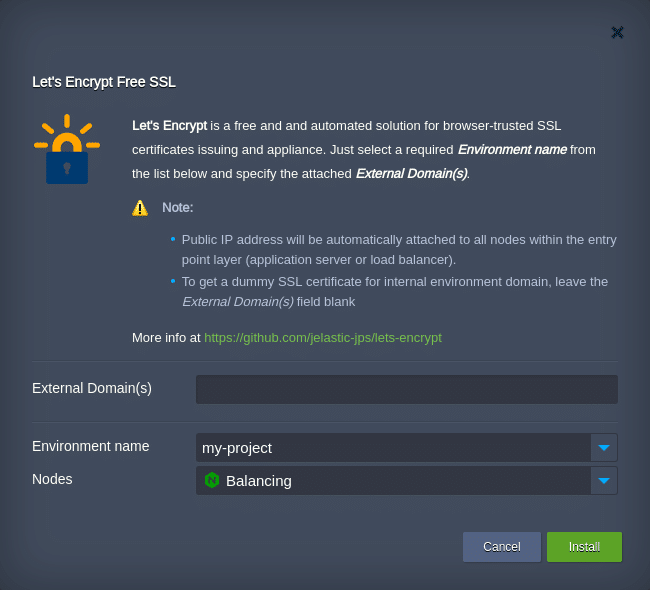
Here, you need to:
- provide External Domain(s) of the target environment, the possible options are:
- leave the field blank to create a dummy SSL certificate, assigned to environment internal URL (env_name.{hoster_domain}), for being used in testing;
- insert the preliminary linked external domain(s) to get a trusted certificate for each of them; if specifying multiple hostnames, separate them with either comma or semicolon.

- select the corresponding Environment name within the expandable drop-down list;
- select a Nodes layer with your environment entry point (usually, it’s automatically detected and fetched by the add-on, but can be redefined manually).
Finally, click on Install to initiate the installation of the appropriate SSL certificate(s).
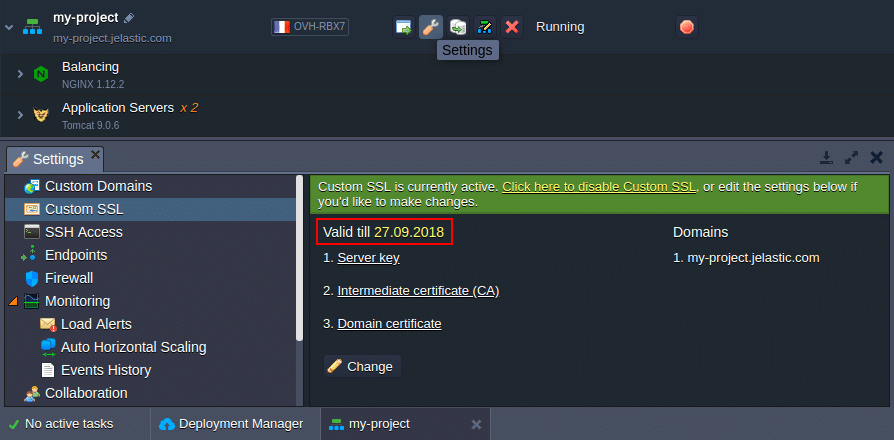
3. The installation process may take up to several minutes in order to validate domain name ownership, issue certificates by Let’s Encrypt and apply them. When finished, you can access the environment Settings > Custom SSL section to check that the HTTPS support is active and find the certificate expiration date.
4. Also you can ensure everything works like intended by trying to open the application over HTTPS:
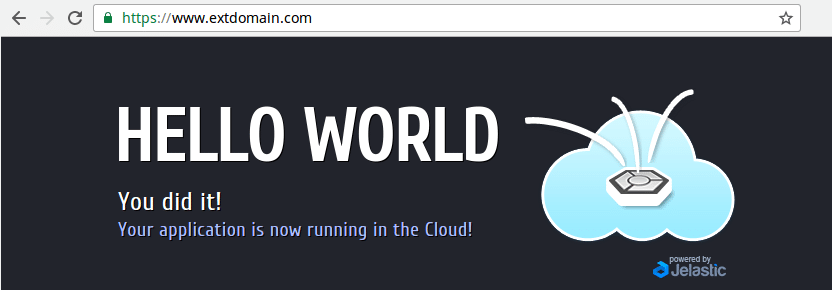
As you can see, the environment is accessible and the established connection is secure and browser-trusted.
Let’s Encrypt Certificates Update
Your Let’s Encrypt SSL certificate(s) will remain valid for 90 days. After this period expires, they need to be renewed for the encryption to remain active.
By default, the required updated SSL certificates are requested and applied automatically 30 days before expiration (you’ll get the appropriate email notification). Such a checkup is performed once per day based on the appropriate cron job. If needed, the exact time can be specified through adjusting the corresponding “cronTime”: “0 ${fn.random(1,6)} * * *” setting within this package manifest file.
Also, this operation can be performed manually at any time. For that, click the Add-ons button next to the appropriate environment layer and use the Update Now button within add-on panel.

Also, your SSL certificates can be updated by add-on re-installation for the same domain name(s). Herewith, adding new or specifying different domain name(s) during this procedure will cause the complete replacement of user certificates.
Let’s Encrypt Certificates Reconfiguration
In case of necessity, the already existing Let’s Encrypt add-on can be adjusted to match new requirements (i.e., to replace the currently used domain names with a list of new ones).
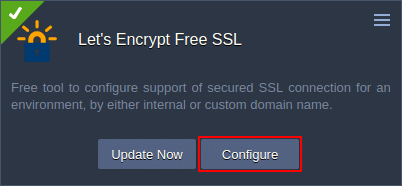
Just click the Configure button within Let’s Encrypt panel and type a new External Domain(s) list in the appeared pop up window.
Let’s Encrypt SSL Add-On Removal
If necessary, the Let’s Encrypt SSL add-on can be easily removed from your environment. Just go to the Add-ons tab, expand the options list in the top-right corner of the Let’s Encrypt SSL plank and select Uninstall.
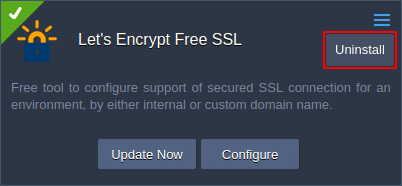
After confirmation, the add-on will be removed and attached certificates will be deactivated.
That’s it! Now you know how to install and manage Let’s Encrypt add-on for automatic custom SSL configuration of your environment to protect almost any application in no time, completely for free and without hardly any efforts. Get started now with a free trial period at our Jelastic PaaS platform.