Node.js is an open-source and cross-platform run-time environment, which allows to use JavaScript not only for the client-side development but also for the server-side applications.
Recently, the Node.js stack template at Jelastic was improved through integration with the Docker containers technology support. This makes Node.js server configuration and new engine versions delivery much more simple and hassle-free.
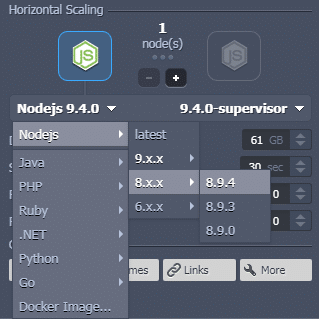
One more major enhancement is an extension of the list of supported Node.js versions with the newest ones – the following engines are available for now:
- 6.x – legacy stable;
- 8.x – current stable;
- 9.x – mainline version with the latest features (still under development).
And below we’ll consider all the changes this update has brought and the main specifics of Node.js hosting implementation within Jelastic PaaS.
Node.js Stack Architecture in Jelastic PaaS
Jelastic PaaS leverages the container-based approach to deliver stacks to end-users, each of which represents an isolated instance. Herewith, platform orchestrator automatically ensures the maximum high availability of your Node.js application through distributing virtual server nodes from within a single environment across different physical nodes – this is what we call anti-affinity.
Also, there is a number of extra advantages you get automatically when hosting your Node.js application(s) at Jelastic PaaS:
- Convenient server life-cycle management with abilities to launch, scale, restart, stop the node, deploy and update application directly through the comfortable Jelastic GUI;
- Possibility to update container “on-a-fly”, which is rather important for Node.js developers as new versions of this engine are released pretty frequently (once per month on average). With Jelastic, this procedure is absolutely safe and eliminates you from the necessity to create and configure new server each time the new Node.js version becomes available;
- A number of embedded package and process managers allows you to start working with your server just after its creation, without any preliminary manual tuning. Namely, the npm (used by default) and yarn package managers are both supported out-of-box, whilst the preferred process manager can be set via the environment topology wizard (the appropriate option is circled in the image below).
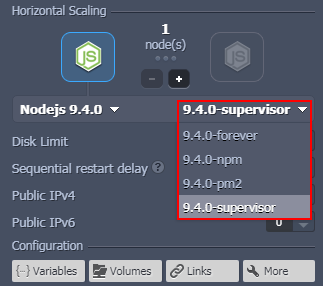 Here, you can choose between npm, forever, supervisor and pm2 process managers when creating your Node.js server, as well as switch it any time later – just click on the Change environment topology button next to your Node.js environment to access the corresponding frame.
Ways of Node.js Apps Deployment
For the Node.js application deployment, its source code can be delivered to a platform in a view of .zip/.tar.gz archive (either uploaded from your laptop or via the publically available URL) or fetched from a Git/SVN repository – more details on the corresponding deployment flows can be found in the linked documents.
Note: When updating your Node.js application, please consider the following points:
- If re-deploying your project with an archive, the Platform will normally erase all the files that were previously stored within a container;
- If using a GIT repository as a source code storage, the system will execute the git pull command when the update procedure is called, so that only the modified files will be renewed.
Building Application & Resolving Dependencies
Once the source code is fetched, Jelastic launches npm install (or yarn install, if it was set as a default package manager) in the root project directory to install/update all the packages, defined within the package.json.
Starting Node.js Server
After the required packages are successfully installed, Jelastic launches Node.js server. Depending on the chosen process manager. one of the following commands will be used for that: npm start, pm2 start, supervisor start or forever start (the specifics of each process manager will be described further down this article).
However, it’s not a problem if a server is not started after the first attempt (sometimes it could happen due to one of the node’s ports being still busy). In this case, the Platform will try to launch it up to 60 times with a 1-second delay.
Herewith, if the main Node.js process is listening to a custom HTTP port (i.e., neither 80th nor 8080th one), Jelastic will make automatic traffic forwarding from this port to the 80th one. This will make your application available throughout the Internet even if you don’t use a Public IP address for it.
Stopping Node.js Server
When you refer to the Stop or Restart options for your Node.js server, the system executes the kill -9 $NODE_PID command to shutdown its main process.
Node.js Server Troubleshooting
Jelastic retains information on all of the occurred container lifecycle events, storing the list of executed commands and their output. So if you face any issues during your Node.js application deployment, you always can refer to the detailed information on the handled operations using the built-in Log manager.
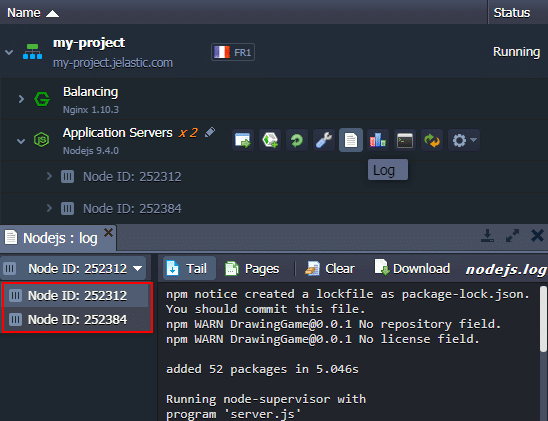
Herewith, in case your Node.js server is horizontally scaled, you can browse the corresponding log files for each particular instance in a separate window.
Server Tuning Possibilities
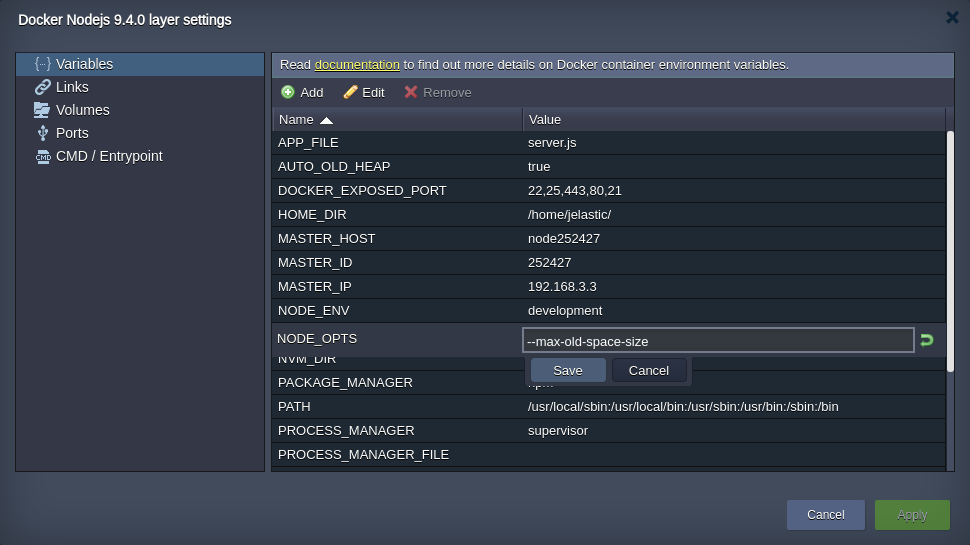
Node.js tuning process in Jelastic is pretty straightforward thanks to the embedded option of Docker environment variables management at the Platform dashboard. Just access the Additionally > Variables frame for the appropriate container and modify any required parameters through the comfortable graphical interface of Jelastic control panel.
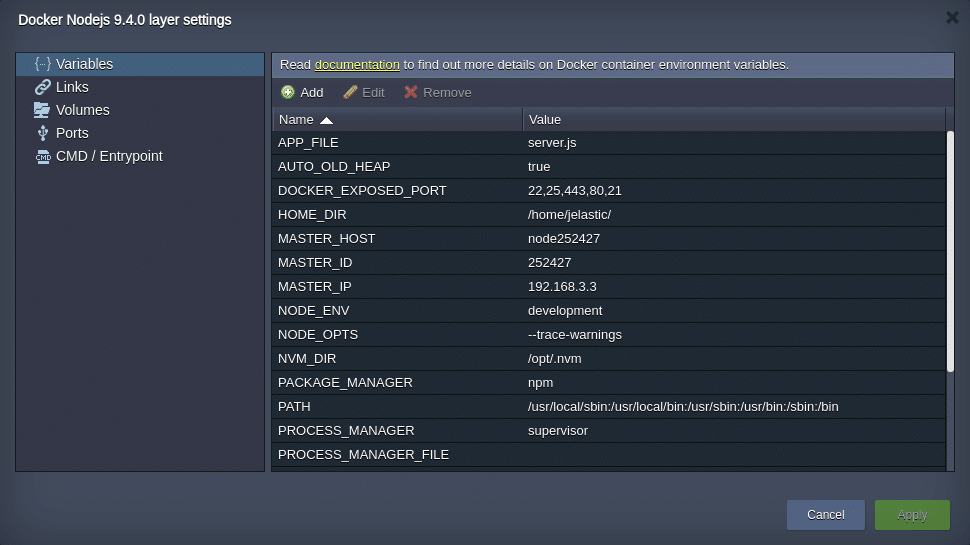
The most commonly used variables are:
- PACKAGE_MANAGER (npm by default, can be set to yarn) – specifies the utility for managing application packages and dependencies;
- PROCESS_MANAGER (npm by default, pm2, supervisor and forever values are possible) – for choosing the process manager that will run the deployed application;
- PROCESS_MANAGER_FILE – lists configuration options for process managers;
- AUTO_OLD_HEAP (true by default, can be set to false) – turns the Jelastic NodeJS memory auto-configuration on/off;
- NODE_ENV (development by default, more details on possible values can be found here) – variable used by such Node.js frameworks as Express and similar ones;
- APP_FILE (server.js by default) – name of the main application executable file (i.e., the one that should be launched when the application is started); recommended to be specified as a file path, relative to the server Webroot directory.
Securing Connection to Node.js Apps with SSL
To secure your Node.js application, hosted at Jelastic PaaS, you can either utilize the embedded Jelastic SSL feature (for internal domains) or apply Custom SSL (if your environment has an external domain bounded). Alternatively, you can install the Jelastic Let’s Encrypt add-on, which provides the mentioned options free of charge.
- With Jelastic SSL feature, you can quickly get a security stamp for the required domain and indemnify interception of your users’ private data for a low cost. It can be enabled either during the environment creation or subsequently when changing the environment topology, through the environment topology wizard – for that, click on the SSL button above the topology structure and switch the corresponding switcher on;
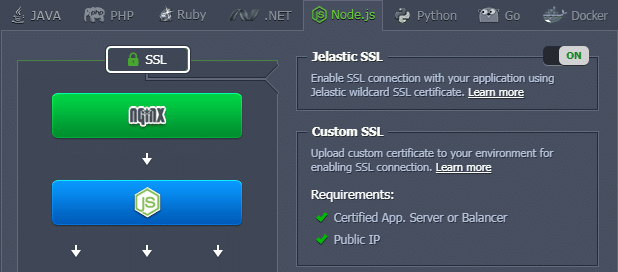
- To get the required level of security for custom environment domain name, you need to activate the Public IP address option for the preliminary added load balancer node in your environment. And after that, you can switch to the environment Settings > Custom SSL section and upload the appropriate certificate files;
- The last, but not the least option is Let’s Encrypt add-on, which provides full-fledged SSL certificates for free. To get this tool installed, go to the Marketplace > Add-ons section, locate the same-named plank and click on the Install button;
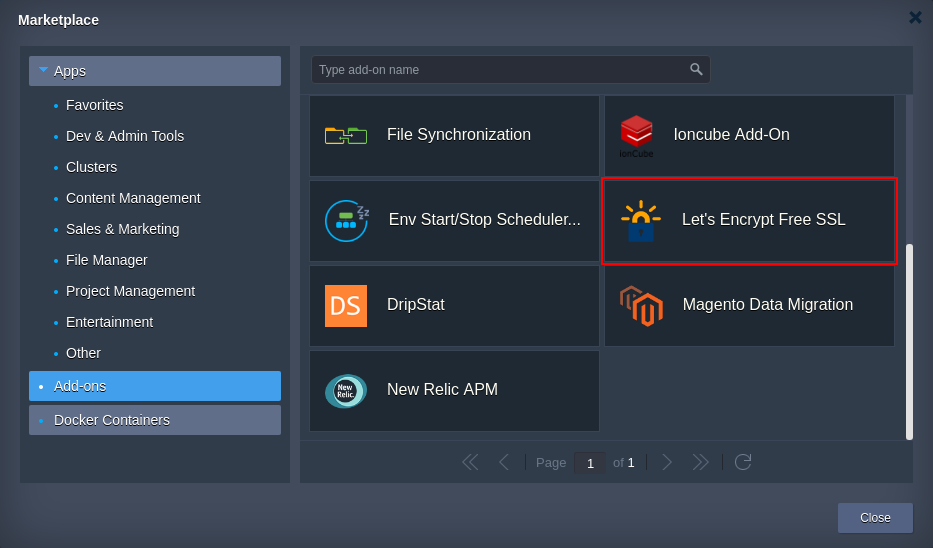 Wait a few minutes and you’ll see a message that a Let’s Encrypt add-on has been successfully added to your environment.
Automatic Node.js Memory Configuration
Although Node.js run-time is equipped with embedded mechanisms of dynamic memory allocation and garbage collection, sometimes you may face the necessity to tune the appropriate memory limits by setting the required values manually.
In particular, this concerns the maximum Node.js heap size, which is commonly set to the predefined values of 512 MB or 1400 MB within all 64-bit and 32-bit systems respectively. Within Jelastic PaaS, this value is calculated automatically based on the total amount of the memory, allocated to a container each time you scale your Node.js server (either in or out). To control this behavior, the AUTO_OLD_HEAP variable is used. If it’s set to true, the —max-old-space-size value from the NODE_OPTS parameter is considered to set the optimal old heap space size. This helps to eliminate memory errors and optimizes all available memory to improve the performance of deployed applications.
By default, –max-old-space-size is set equal to 90% of memory (RAM), allocated to a container. However, if the difference between the total memory amount and the –max-old-space-size is less than 64 MB, this variable value will be calculated according to the formula (total_RAM – 64MB). Herewith, if you’d like to disable this optimization, you can just specify the required custom maximum heap size (in MB) within the NODE_OPTS variable manually, e.g., “–max-old-space-size = 128”.
As you see, in Jelastic all the necessary tools are implemented to install and manage your Node.js application. And with the newly integrated support of the newest versions of this stack, you can take advantage of all the corresponding updates almost immediately after they are released. Coming to this point, we believe you’d like to leverage all the described above advantages of the current Node.js implementation at Jelastic PaaS by yourself – for that, just start a free trial at our Jelastic PaaS platform.